Sigma Labs announces PrintRite3D Version 5.0, an integrated, interactive system combining inspection, feedback, data collection and critical analysis for metal additive manufacturing. The product is being introduced at the RAPID+TCT Additive Manufacturing Conference in Detroit, May 20-23, 2019.
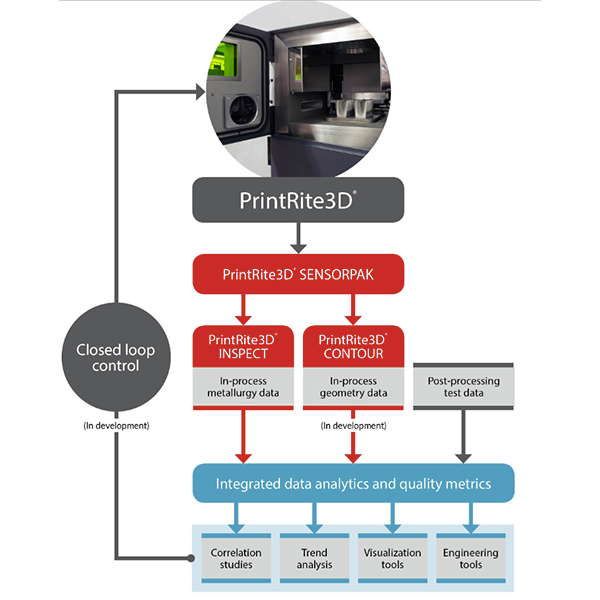
The system pairs PrintRite3D SENSORPAK multi-sensors and hardware with PrintRite3D INSPECT, PrintRite3D CONTOUR and PrintRite3D ANALYTICS software modules for comprehensive management of AM processes.
Companies using metal additive manufacturing (AM) have traditionally been hindered by the inability to analyze the structure of a part during the manufacturing process. They also lacked the ability to make real-time adjustments to ensure an acceptable level of quality. Sigma Labs says PrintRite3D Version 5.0 resolves these challenges with results “comparable and complementary to CT testing.” Sigma Labs claims this update provides value to OEMs and manufacturers, and can increase production yield of 3D metal manufactured parts, cut post-process quality inspection costs and reduce time to market for parts and products made using metal additive manufacturing.
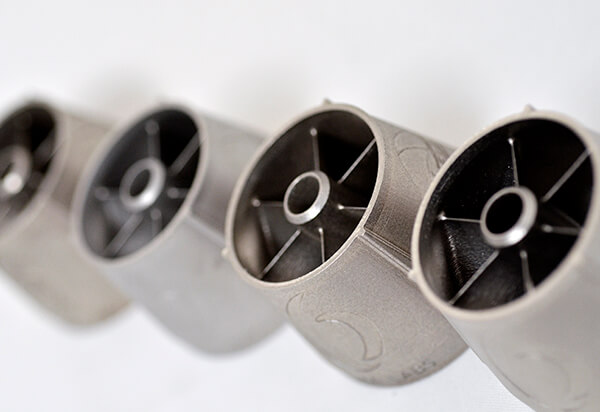
The launch of PrintRite3D Version 5.0 comes shortly after news of a DARPA-funded research project at Honeywell Aerospace on the use of Sigma Labs technology as available in PrintRite3D. The study (“LPBF [Laser Powder Bed Fusion] Right the First Time—the Right Mix Between Modeling and Experiments” https://link.springer.com/article/10.1007/s40192-019-00133-8) was published in the journal Integrating Materials and Manufacturing Innovation. It describes the validation involved in manufacturing a challenging metal component. Sensors were used to develop a new in-process quality metric called thermal emission density (TED), used to monitor component quality with respect to porosity as the part was being built. The research paper concludes: “This work has demonstrated that a combination of physics-based modeling and experimental verification and validation can enable early-stage identification and elimination of potential problems. The build was directly successful and component testing confirmed achievement of the targeted porosity, geometric accuracy, and mechanical strength of the printed material.”
Key elements of the PrintRite3D®Version 5.0 platform include:
- mines and identifies thermal signatures of melt pool disturbances and respective discontinuities using thermal emission spectroscopy;
- harnesses co-axial Planck thermometry to provide a verified thermal signature in both temperature and coordinates;
- uses in-process quality metrics (IPQMs), thermal emission density (TED) and thermal emission Planck (TEP) to analyze internal thermal signatures and melt pool disturbances;
- contains a graphical user interface for real-time display of live part quality results and automated anomaly detection on thermal mapping images providing location and anomalous region size;
- collects data with fixed spatial resolution in the X/Y plane and variable Z plane resolution depending on layer height used during the manufacturing process; and
- is platform-independent and available as a third-party add-on or retrofit package for existing metal AM machines.
Sigma Labs says benefits of using PrintRite3D include the ability to gather objective evidence of adherence to design intent; standardization on one quality system across all machines plant-wide; early defect detection; production optimization; scrap reduction and increased yield.

PrintRite3D Version 5.0 is a set of software applications and a set of sensors, deployed with a ruggedized Windows tablet. PrintRite3D ANALYTICS is the core manufacturing intelligence application. The software and its database links all critical data over multiple builds, machines and fabrication sites over time. ANALYTICS also provides management of and access to all in-process and post-process data over the entire product lifecycle. These data analytics capabilities are integrated within the INSPECT and CONTOUR software products.
PrintRite3D INSPECT is an application for in-process inspection of metallurgical properties.Sigma Labs says it uses sensor data to establish in-process metrics for each metal or alloy in use. Manufacturing engineers receive part quality reports based on statistical analysis of the manufacturing process data. INSPECT also allows for interrogation of suspect part data and can be used for process improvement and optimization.
PrintRite3D CONTOUR (not yet released) is an application for real-time monitoring of in-process part geometry. It measures geometry layer by layer and provides the capability to compare as-built to the original digital CAD model ‘should-be.’ CONTOUR also includes optics, mechanical system and data path information for imaging two-dimensional melted powder.
PrintRite3D SENSORPAK is a set of sensors (off-axis and on-axis) and related hardware for collecting real-time data on AM processes. When coupled with PrintRite3D INSPECT or PrintRite3D CONTOUR modules, Sigma Labs says SENSORPAK enables part quality assessment during manufacturing, by measuring the true in-process state variables associated with an additive manufacturing process.
PrintRite3D Version 5.0 is now available direct from Sigma Labs.
To learn more about PrintRite3D SENSORPAK.
To learn more about PrintRite3D INSPECT.
To learn more about PrintRite3D CONTOUR.
Watch a video about PrintRite 3D.
See why DE’s Editors selected Sigma Labs PrintRite3D Version 5.0 as their Pick of the Week.
Sources: Press materials received from the company and additional information gleaned from the company’s website.
About the Author
Press releases may be sent to them via [email protected]. Follow Robotics 24/7 on Facebook
Follow Robotics 24/7 on Linkedin
Article topics
Email Sign Up

